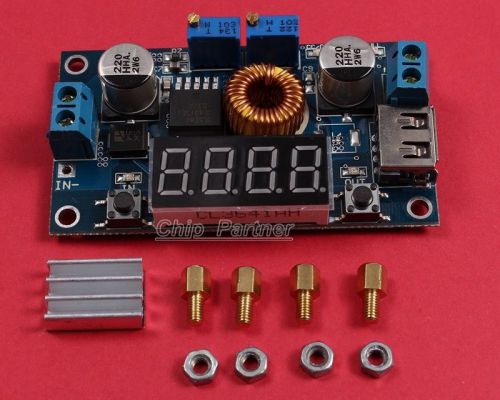
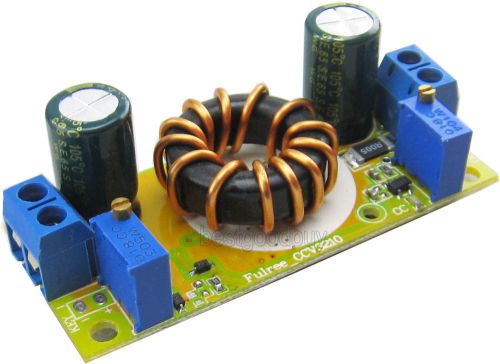
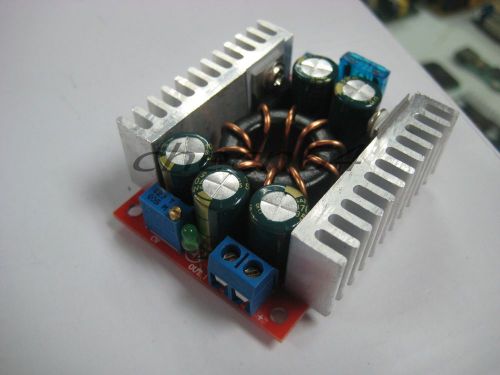
Get free tracking number for orders over $40 Hot sales !!! 5PCS MB102 Power Supply Module 3.3V 5V Solderless Breadboard For Arduino 10pcs DC-DC Converter Step Up Module 1-5V to 5V 500mA Power Module 10pcs LM2596S power module DC-DC Buck Converter Step Down Module 2PCS Step down 5A 5V-32V to 0.8V-30V Lithium Charger power supply module DC-DC 600W Step Up 12V-60V to 12V-80V Power Apply Module High-Power DC-DC 4.5V-32V to 0.8V-30V 15A Step Down Power Apply High-Power $7.56+ free shipping $9.82+ free shipping $12.92+ free shipping $10.28 + free shipping $23.64 + free shipping $15.52+ free shipping Product Name:USB Load Tester USB Current Tester Mobile Power Current Detection More Items In Our Store,Click Here! 5A LED Drive Lithium battery charger with Voltmeter Ammeter DCDC module Highlights : Contains the voltmeter, ammeter, power meter, USB interface for charging the digital products. Note: 1.When you use the product, the module inputs and outputs to be isolated from ground. 2.USB output voltage is consistent with the module, not a fixed 5V output. When charging for digital equipment, make sure USB output voltage is 5V. 3.Some customers report: “The module can not adjust the output voltage is always equal to the input voltage.” When you encounter this problem, please counterclockwise rotation of the “voltage potentiometer” 10 laps or more, then use the module you can adjust the output voltage. Because the factory default output voltage of about 20V. Specifications 1.Input voltage range:5-36VDC 2.Output voltage range:1.25-32VDC adjustable 3.Output current: 0-5A 4.Output power: 75W 5.High efficiency up to 96% 6.Built in thermal shutdown function 7.Built in current limit function 8.Built in output short protection function 9.Input reverse polarity protection: None (if required, high current diode in series with the input). 10.L x W x H =68.2x38.8x15mm 11.Weight: 39g Application 1.Use as a step-down modules with overcurrent protection Usage: (1) Adjust the right button so that “OUT” LED lighted, Digital meter shows the value of output voltage ,adjust the “voltage potentiometer” so that the output voltage reaches the value you want. (2) Adjust the right button so that Digital meter shows the value of output current;Wire shorted output terminal, then adjust the “current potentiometer” so that the output current reaches a predetermined overcurrent protection value. (For example, the Digital meter displays the current value of 4A, then you can use the module to a maximum current of 4A) (3) Connected to the load. 2.Use as a battery charger Usage: (1) Make sure you need to charge the battery float voltage and charging current; (if lithium parameters 3.7V/2200mAh, then the float voltage is 4.2V, the maximum charging current 1C, ie 2200mA) (2)Under no-load conditions, adjust the “Voltage potentiometer” so that the output voltage reaches the float voltage; (if to 3.7V rechargeable lithium battery, the output voltage can be adjusted to 4.2V) (3)Adjust the right button so that Digital meter shows the value of output current;Wire shorted output terminal, then adjust the “current potentiometer” so that the output current reaches a predetermined Charging current value. (4)Charge turn lamp current factory default is 0.1 times the charging current; (Battery during charging current is gradually reduced, if the charge current setting is 1A, then when the charge current is less than 0.1A, blue lights turned off, the green light is on, which means that the battery is fully charged) (5)connected to the battery charge. (1,2,3,4 steps as: Output is unloaded, do not connect the battery) 3.Use as a LED constant current driver module Usage: (1)Adjust the “voltage potentiometer” so that the output voltage reaches the value you want. (2)Adjust the right button so that Digital meter shows the value of output current;Wire shorted output terminal, then adjust the “current potentiometer” so that the output current reaches a predetermined LED operating current. (3)Connect LED, work. (1,2 steps as: Output is unloaded, do not connect LED) Voltmeter and ammeter calibration method: Module with manual calibration function can correct display precision voltage and current, if you think the current voltage and current accuracy to meet therequirements, do not perform the following operations. (1) Output voltage calibration steps Step 1, adjust the right button so that “OUT” LED lighted, Digital meter shows the value of output voltage; Press the right button for more than 2 seconds, release, Digital meter and “OUT” LED flashes in synchronization so that you enter the output voltage calibration mode. Step 2, press the right button (normal speed), the voltage value is adding up a unit; Press the left button, minus a unit; Due to a unit is less than 0.1V,the minimum voltage display to 0.1V, so you need to continuously press 1-5 times to see the voltmeter change 0.1V, how many times voltmeter change 0.1V by pressing the key, depending on the current display voltage, the higher the voltage, the fewer the number of press. Step 3, press the right button for more than 2 seconds, release, to exit the output voltage calibration mode. All parameters set to automatically power down to save. (2) Input voltage calibration steps Step 1, adjust the right button so that “IN” LED lighted, Digital meter shows the value of input voltage; press the right button for more than 2 seconds, release, Digital meter and “IN” LED flashes in synchronization so that you enter the input voltage calibration mode. Steps 2 and 3, consistent with the output voltage calibration method. (3)Output current calibration steps Step 1, adjust the right button so that Digital meter shows the value of output Current. Press the right button for more than 2 seconds, release, Digital meter flashes in synchronization so that you enter the output current calibration mode. Step 2,Connected to the load, ammeter in series, adjust the right and left button to change the display of digital meter, so that is consistent with the ammeter display . Maybe you also need: 1PCS MB102 Breadboard Power Supply Module 3.3V/5V For Arduino Board 1PCS Breadboard 830 Point Solderless PCB Bread Board MB-102 MB102 Test DIY 65pcs Wire Breadboard plug wire Bread board cable Bread board tie line DC Power Apply Pinboard 5.5x2.1mm Adapter Plate 10 pcs DIY Prototype Paper PCB Universal Board 5 x 7 cm New 1PCS10A 12V 120W SMPS Regulated Switching Power Supply Driver $1.98+ free shipping $4.92+ free shipping $2.76+ free shipping $1.52+ free shipping $3.90+ free shipping $23.35+ free shipping HOT Category On sale Wholesale Combination ICs & Processors Sensors Arduino Cables & Connectors LCD module Power modules Breadboards Motors & Drivers DIY PCB Board Servo Motors USB/RS232 to TTL DIY Kits Wireless modules Wireless Bluetooth PIC Programmer AVR Programmer Color LEDs Resistors & Potentiometers For more quantity, please contact us 1) We accept PayPal payment ONLY. inkFrog Analytics On Apr-29-14 at 23:00:16 PDT, seller added the following information: On May-26-14 at 04:23:29 PDT, seller added the following information:
By clicking "Accept All Cookies", you agree to the storing of cookies on your device to enhance site navigation, analyze site usage, and assist in our marketing efforts.