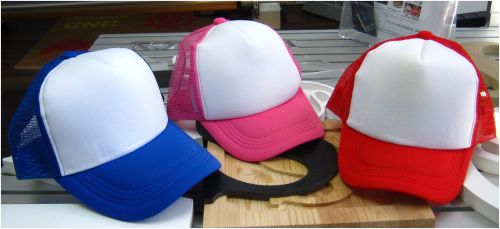
SUBLIMATION HAT (CHILDREN) - 20 PCS (RED, BLUE OR PINK) This two-tone trucker hat is popular because of its ventilated mesh back that helps keep your head cool. This two-tone trucker hat work well with Sublimation printers & Sublimation inks. Use family photos, personal motos to stand out in the crowd! Not only this product will cover head, but it also makes an excellent promotional item for companies and events! Specification: Red, Pink or Blue Size: Children Quantity: Box of 10 hats SURFACE PRESS TIME TEMP PRESSURE TIPS / COMMENTS SOFT L'INK T-SHIRTS 35-40 seconds 400° F - 204° 40 psi (medium) Pre-press shirt for 3-5 seconds to eliminate moisture. Tack spray transfer and use blow-out sheet to avoid ghosting. How-To Application – Sublimating Poly-Performance Apparel – Method #1 Temperature: 400°F (195-200°C) Time: 50-60 Seconds Pressure: Light to Medium Sublimation works best with 100% polyester fabric, not cotton. Though it’s possible to sublimate a design on a poly/cotton blend shirt, there will be a significant degradation in quality, resolution and detail. Unless you are trying to create “special effects” you should only choose 100% poly-performance apparel for sublimation. Instructions 1. Prepare your artwork and transfer with consideration to the size of the garment. 2. It is recommended that you trim the transfer paper as close to the edge of the printed image as possible 3. Spread a Teflon sheet (or white paper) on the bottom of the press. 4. Place the shirt, face-up, on the press and smooth out folds and wrinkles. 5. Place the transfer, facedown, in position on the shirt. Cover the shirt and transfer with a Teflon sheet or while ensuring that the transfer and shirt remain in position. 6. Press with medium pressure 50-60 seconds. 7. When the pressing time is up remove the transfer sheet as smoothly and quickly as possible (this is to avoid creating a ‘shadow’ imag 9. Remove the shirt from the press. 10. Allow to cool on a clean surface. Additional notes: • Please take note of the variation of printable areas from shirt size to shirt size. You may need to adjust your transfer size for each shirt size or design a size that will suit all sizes. • You may choose to “pre-press” your garment for 5 seconds to remove and moisture that may be present. • A lint brusher or roller will remove any clinging debris that may compromise your imaging. • To sublimate to a Soft L’Ink Sweatshirt, use the same instructions as the Tee’s, but increase press time by 10 seconds. How-To Application – Sublimating Poly-Performance Apparel – Method #2 Temperature: 400°F (195-200°C) Time: 50-60 Seconds Pressure: Light to Medium With some polyester shirts, the combination of heat and pressure will result in “press lines” where the edges of the transfer paper came in contact with the garment surface. The use of a layer of high temperature foam during pressing may solve this problem. Instructions 1. Obtain a sheet of high temperature foam (contact your equipment dealer) and place it in your heat press along with a blank shirt. Adjust the platen pressure so that the foam is compressed to no more than half of its original height. (Experiment as needed to find the best pressure setting for your press.) Once the pressure is set, remove the shirt and foam. 2. Prepare your artwork and transfer with consideration to the size of the t-shirt. 3. If trimming the transfer paper, leave a 1” to 2” margin on all sides. 4. Cut the foam so that the edges are smaller than the transfer paper’s outer edges, but approximately the size of the printed image. 5. Trim the top edges of the foam to a 45odegree angle to create bevelled edges all the way around. 6. Spread a Teflon sheet (or white paper) on the bottom of the press. 7. Place the prepared foam on top of the Teflon sheet. 8. Place the shirt, face-up, on the press over the top of the foam. Smooth out folds and wrinkles. 9. Place the transfer, facedown, in position on the shirt. Carefully position the foam, such that it is centered under the transfer, with the edges of the transfer extending over the edges of the foam. 10. Cover the shirt and transfer with a Teflon sheet while ensuring that the transfer and shirt remain in position 11. Press with medium pressure 50-60 seconds. 12. When the pressing time is up remove the transfer sheet as smoothly and quickly as possible (this is to avoid creating a ‘shadow’ image) 9. Remove the shirt from the press. 10. Allow to cool on a clean surface. CAUTION – Only use foam that is designed for high temperatures (400oF minimum), otherwise some melting may occur which could damage the shirt. Shipping Shipped next or same business day. Shipped to confirmed address. Arriving in 3-5 business days in most areas Once shipped, tracking information will be automatically shown on the eBay purchase history. Standard shipping is usually by UPS ground. UPS does not deliver to P.O. Box. Ships to U.S. and Canada only. FEEDBACK Please contact us if you feel there is a reason to not provide us with Positive feedback and 5 star ratings. We are always willing to resolve any issues, but not after negative feedback has been left. Positive feedback will be left after you have left positive feedback for us. If there is ever any problem with your product, please give us the chance to fix it. We have worked very hard to keep our feedback score at 100%.
By clicking "Accept All Cookies", you agree to the storing of cookies on your device to enhance site navigation, analyze site usage, and assist in our marketing efforts.