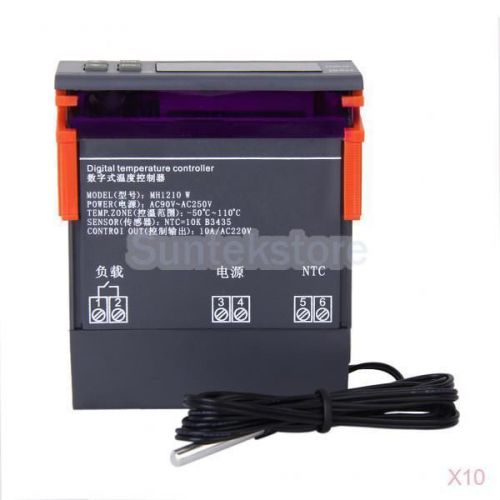
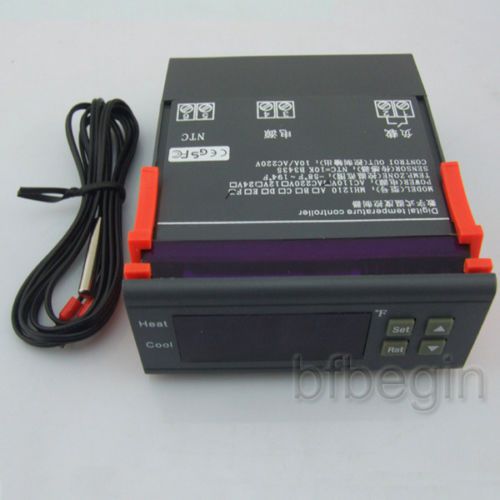
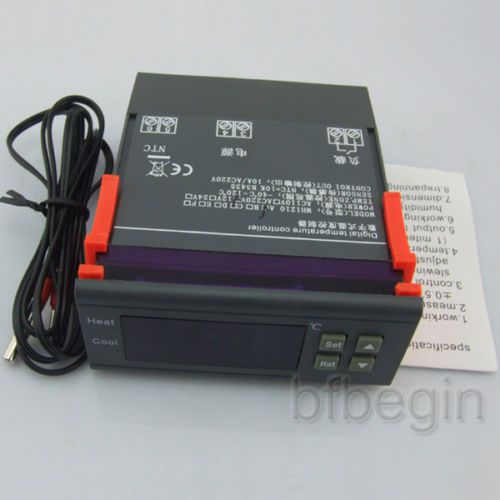
220V Double Digital Temperature Controller + Humidity Controller ( if you need 110V or 12V temperature controller, please buy my other item. ) Thermostat + Humidity Controller Specification: Temperature Measuring Range: -50 ~ 110 °C Control temperature range: -50 ~ 110 °C Resolution: 0.1 °C Accuracy: ± 1 °C Sensor Length: 3M Power Suppler : 220V Power consumption: < 2W Relay contact Current: Rated 10A 220V Working temperature: -20°C - 80 °C Size: 180 x 100 x 58 mm ( L*W*H ) Weight: 480 g Install Window Size: 170.5 x 95.5 MM Humidity Measuring Range: 0% ~ 100% RH Humidity controlling range: 0% ~ 100% RH Resolution: 1 % RH Accuracy: ±1%RH Relay contact Current: Rated 10A Thermostat Controller ?LED Status Description: The WORK light is used as working indicator lights, flashing is to indicate the delay of cooling or heating, if the LED is always on, it indicates it is on the status of cooling or heating . The SET light is used as setting indicator lights, if the LED is always on, it indicates it is on the status of setting. ?Turn on or off the thermostat: When it is wired up, the state of being acquiescent is power on. Press “POWER1” key to switch on and off, press the “POWER 1” key once on the power-off state to turn it on. On the power-on state, press the “POWER 1” key and hold on for three seconds, then it will be off. ?temperature control setting: In the Standby mode, press the “SET1” key once to enter the temperature control setting, press “UP” or “DOWN” button to adjust, press “UP” or “DOWN” button and hold on for three seconds to enter the fast adjusting mode, press the “SET1” key again and back to the standby mode. ?system menu settings: Press “SET1” and “UP”key and hold on for 3 seconds to enter the Thermostat controlled- parameters setting, press the “UP” or “DOWN” key to select the adjustment menu, press “SET1” key once to enter the appropriate parameter settings, press “UP” or “DOWN” to adjust the parameters needed to be modified. After being adjusted, press the “POWER1” key to exit, or exit as the system delay for 5 seconds. ? Menu code statement: Symbol Details Remark HC Heating / cooling H= Heating C= cooling D Hysteresis LS The minimum set limit HS The maximum set limit CA Temperature calibration PT Delay time Minutes AH High temperature alarm settings AL low temperature alarm settings ?Cooling, heating function: Cooling Mode: When the measured temperature is higher than or equal to the set value + hysteresis, the relay picks up to start the output; When the measured temperature below the set value, the relay off and close the output. Heating mode: When the measured temperature is higher than or equal to the set value, the relay off, turn off the output; When the measured temperature below the set value - hysteresis, the relay picks up to start the output. Example for Setting: If it is set to heating mode, set the temperature to 25 degrees, hysteresis is set to 5, then when the measured temperature is higher than or equal to 25 degrees, the relay is off, close the output. When the temperature is below 20 degrees, pick up the relay again, to start the output. Example for Setting: If it is set to cooling mode, set the temperature to 25 degrees, hysteresis is set to 5, then when the measured temperature is below 25 degrees, the relay is off, close the output. When the temperature is higher than or equal to 30 degrees, pick up the relay again, to start the output. ? Cooling, heating mode setting: Press “SET1” and “UP”key and hold on for 3 seconds to enter the menu display, the screen appears "HC" code, press the "SET1" key to display the working mode, press the "UP" or "DOWN" to adjust the display, C means cooling mode; H means heating mode. ? Hysteresis function: Hysteresis setting limits the maximum interval between the opening and stopping. ? Hysteresis settings: Press “SET1” and “UP”key and hold on for 3 seconds to enter the menu display, with "UP" or "DOWN" key adjusted to the screen, appearing "D" code, press the "SET1" key to display the hysteresis set value, press "UP "Or "DOWN" key to adjust the parameters. ? Temperature calibration function: When there is deviation between the measuring temperature and standard temperature, use the temperature calibration function, make the machine measurements value consistent with the standard temperature, the after calibration temperature= the before calibration temperature + calibration value (calibration value can be positive number, negative number, and 0) . ? Temperature calibration settings: Press “SET1” and “UP”key and hold on for 3 seconds to enter the menu display, with "UP" or "DOWN" key adjusted to the screen, appearing "CA" code, press the "SET1" key to display the temperature calibration settings, press "UP "Or"DOWN"key to adjust the parameters. For example: When we measure the probe temperature was 25 degrees, it displays 25 degrees as the CA is 0, it displays 26 degrees as the CA is 1, it displays 24 degrees as the CA is -1. This function is generally applied when the probe can not measure directly the measured object. For example, we place the probe at the outside of a cup to measure its water temperature, we need to adjust the CA parameters because of the heat loss of the cup, so that the display temperature can be in accordance with the one of the cup. ? Delay Protection Function: In the cooling mode, the first power on, when the measured value above the set value + hysteresis value, the machine will not immediately start cooling, it needs to set the delay time, then the machine can run to start cooling; once the interval between two cooling is larger than the delay time, the machine immediately starts cooling, once the interval between two cooling is less than the delay time, the machine must run the remaining delay time to start cooling. The delay time is started to calculate from stopping the machine. The delay time of heating mode is as same as the cooling mode. Note: It is recommended that only the device that use compressor cooling can use the delay start function, the user who don't need delay start function please set this parameter to 0. ? Delay Protection Setting: Press “SET1” and “UP”key and hold on for 3 seconds to enter the menu display, with "UP" or "DOWN" key adjusted to the screen, appearing "PT" code, press the "SET1" key to display the delay setting value, then press the "UP "or "DOWN"key to adjust the parameters. ? Upper and lower limit functions: The setting of HS and LS limit the set range of control temperature point , for example: HS is set to +15, LS is set to -10, the control temperature can only be adjusted between -10 and +15, when the control temperature to -10 then press "DOWN" key, the display will remain on the status of -10 and not decrease; when the control temperature to +15 then press "UP" key, the display will on the status of 15 and not increase. If the set point outside this range, it needs to firstly change the value of HS and LS, then it can be achieved. ?Upper and lower limit settings: Press “SET1” and “UP”key and hold on for 3 seconds to enter the menu display, with "UP" or "DOWN" key adjusted to the screen, appearing "HS" or "LS" code, press the "SET" key to display the upper or lower limit set value, Then press "UP" or "DOWN" key to adjust the parameters. HS means upper limit. LS means lower limit. ?High temperature alarm: If the measured temperature>= set temperature + AH alarm output relay. Thermostat alarm will sound, the display alternately shows H and the current temperature. Alarm, press any key to stop the alarm and relay output. ? High temperature alarm settings: Press “SET1” and “UP”key and hold on for 3 seconds to enter the menu display, with "UP" or "DOWN" button transferred to the screen appears "AH" code, press the "SET1" key to display the high-temperature alarm settings, press "UP "or" DOWN "key to adjust the parameters ? Low temperature alarm function: If the measured temperature = set Humidity + AH alarm output relay. Humidity alarm will sound, the display alternately shows H and the current Humidity. Alarm, press any key to stop the alarm and relay output. ? High Humidity alarm settings: Press “SET2” and “UP”key and hold on for 3 seconds to enter the menu display, with "UP" or "DOWN" button transferred to the screen appears "AH" code, press the "SET2" key to display the high- Humidity alarm settings, press "UP "or" DOWN "key to adjust the parameters ? Low Humidity alarm function: If the measured Humidity
By clicking "Accept All Cookies", you agree to the storing of cookies on your device to enhance site navigation, analyze site usage, and assist in our marketing efforts.