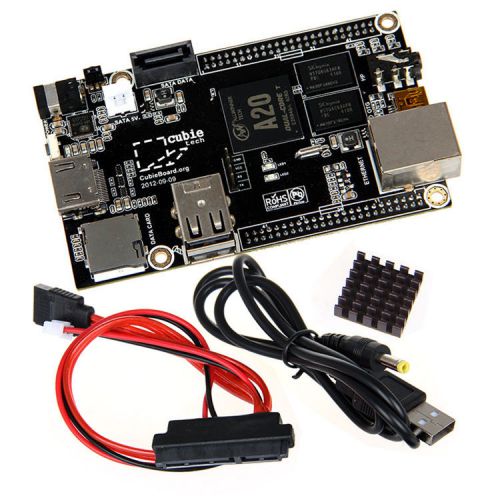
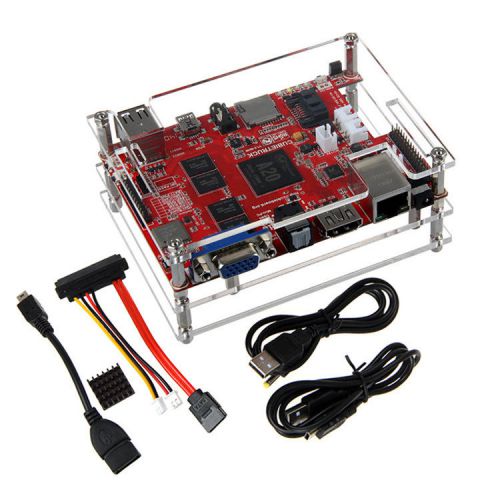
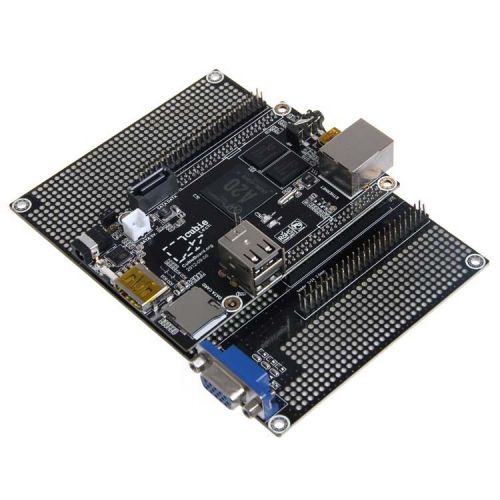
Welcome to our store! Description We are only the official agent. Please kindly contact Banana Pi for technical support. What’s Banana Pi? It’s an open-source single-board computer. It can run Android 4.4, Ubuntu, Debian, Rasberry Pi Image, as well as the Cubieboard Image. It uses the AllWinner A20 SoC, and has 1GB DDR3 SDRAM What can I do with Banana Pi? Build… A computer A wireless server Games Music and sounds HD video A speaker Android Scratch Pretty much anything else, because Banana Pi is open source Who’s it for? Banana Pi is for anyone who wants to start creating with technology – not just consuming it. It's a simple, fun, useful tool that you can use to start taking control of the world around you. Hardware specification Quick Start Guide 'Step 1: Get what you need.' First time to enjoy your Banana Pi, you need at least the accessories in the table below. HDMI to HDMI lead HDMI to DVI lead AV video lead Micro USB power adapter SD card 'Step 2: Prepare your SD card for the Banana Pi' In order to enjoy your Banana Pi, you will need to install an Operating System (OS) onto an SD card. Instructions below will teach you how to write an OS image to your SD card under Windows and Linux. 1. Insert your SD card into your computer. The size of SD should be larger than the OS image size, generally 4GB or greater. 2. Format the SD card. Windows: i. Download the a SD card format tool such as SD Formatter from https://www.sdcard.org/downloads/formatter_4/eula_windows/ ii. Unzip the download file and run the setup.exe to install the tool on your machine. iii.In the "Options" menu, set "FORMAT TYPE" option to QUICK, "FORMAT SIZE ADJUSTMENT" option to "ON". iv. Check that the SD card you inserted matches the one selected by the Tool. v. Click the “Format” button. Linux: i. Run fdisk –l command to check the SD card node. ii. Run sudo fdisk /dev/sdx command to delete all partition of SD card. Use d command to delete all partition of SD card and use n command to add one new partition. Use w command to save change. iii.Run sudo mkfs.vfat /dev/sdxx command to format all the partition of SD card as FAT32. (x should be replaced according to your SD card node) You can also jump this step under Linux, because write image command dd under Linux will format the SD card automatically. 3. Download the OS image from Download district. 4.Unzip the download file to get the OS image. Windows: Right click on the file and choose “Extract all”. Linux: Run unzip [path]/[downloaded filename] command. If the filename extension is .tgz, run tar zvxf [path]/[downloaded filename] command. Ensure that neither the file name of the image you're using or the path contain any spaces (or other odd characters, for that matter). 5. Write the image file to the SD card. Windows: i. Download a tool that can wirte image to SD card, such as Win32 Diskimager from: http://sourceforge.net/projects/win32diskimager/files/Archive/ ii. Open the unzipped image file. iii.Click Write button. Wait patiently to successfully complete writing. Linux: i.Run sudo fdisk –l command to check the SD card node. ii.Verify if the hash key of the zip file is the same as shown on the downloads page (optional). shalsum [path]/[imagename] This will print out a long hex number which should match the "SHA-1" line for the SD image you have downloaded. iii.Run umount /dev/sdxx to unmount all the partition of the the SD card iv.Run sudo dd bs=4M if=[path]/[imagename] of=/dev/sdx command to write image file to SD card. Wait patiently to successfully complete writing. Please note that block size set to 4M will work most of the time, if not, please try 1M, although 1M will take considerably longer.You can use sudo pkill –USR1 –n –x dd command to check progress 'Step 3: Set up your Banana Pi' According to the set up diagram below, you can easily set up your Banana Pi. 1. Insert the written-image SD card that to the SD card spot on the left side edge of the underside of the board. 2. On the bottom "edge" in the middle of the board is the HDMI Type A (Full sized) port, just on the right of the SATA port. Just connect any HDMI cable from the board to your TV or HDMI Monitor. If you don't have an TV/Monitor with a HDMI or DVI-D port you can use the yellow AV jack located in the middle of the "top" edge and the 3.5 mm stereo headphone jack to the right of it. 3. Plug a USB keyboard and mouse into the USB slots located on the right edge. 4. Just under the USB ports on the right edge is the ethernet connector for anyone who wants to plug the Banana Pi into a wired network. 5. Finally, at the very left of the bottom edge is the micro-usb power connector. Plug in a regulated power supply that is rated at 5V ±5% and at least 1A. Any number bigger than 1A (like 2A) will also work. Avoid using the smaller chargers used for small GSM phones, as these are often unregulated, even if they claim "5V 1A", they may do "5V" and may do "1A", but not at the same time! The mini-USB (on the left) is the wrong one. It’s thicker and looks like a trapezoid with its sides pinched in. The micro-USB (on the right) is the correct one. It is thinner and also looks like a trapezoid except it’s sides are rounded outward. 6. If you have a free 3.5 inch hard drive, you can put it into use on Banana Pi. Connect the SATA cable to the SATA port just between micro-USB and HDMI. Remember put the power cable with 2 male 2.54mm headers into the SATA power. Then you can plug your hard drive into the another side of the SATA cable. Be careful the connection of different color cables. (This step can be skipped) If all goes well, the Banana Pi will boot in a few minutes. The screen will display the OS GUI. 'Step 4: Shut down your Banana Pi ' You can use the GUI to shut down the Banana Pi safely. Also you can run the command in the terminal: sudo halt or sudo shutdown –h now This will shut down the PI safely, (just use the power key to turn off might damage the SD-cards file system). After that you can press the power key for 5 seconds to turn it off. Image Files 'BananaPi_For_Cubieboard_v1.0.tgz' CheckSum: 1. MD5: 1401B8C9F70C44D2B602F972F67E924A 2. SHA1: 87EBE80849EB517C51BFFD8866F75844E08E6B7A 3. CRC32: 17B79BFF Baidu Cloud: Download Link:http://pan.baidu.com/s/1gdeKJr9 Tencent Micro Cloud: Download Link: http://url.cn/Rqs8SM DropBox: Download Link:https://www.dropbox.com/s/txqi5p7yj90hweh/BananaPi_For_Cubieboard_v1.0.tgz Google Drive: Download Link:https://drive.google.com/file/d/0B38hUt6ypQXDaGdvOUJlaHQ4U1E/edit?usp=sharing BananaPi_For_RaspberryPi_v1.0.tgz' CheckSum: 1. MD5: 6BED39A681756E552FDB8B9A965A7944 2. SHA1: 3C75F615766CD380C4267A8459A77EEAA1A3695D 3. CRC32: F7E86406 Baidu Cloud: Download Link:http://pan.baidu.com/s/1gdmSoxX Tencent Micro Cloud: Download Link: http://url.cn/LXBGe3 DropBox: Download Link:https://www.dropbox.com/s/bs0yn13nkmjrrvt/BananaPi_For_RaspberryPi_v1.0.tgz Google Drive: Download Link:https://drive.google.com/file/d/0B38hUt6ypQXDNDlMcTVrbndReUk/edit?usp=sharing Package List: 1 x Banana Pi board Payment 1.We accept PayPal only. 2.Payment must be received within 7 business days of auction closing.,or a unpaid case will be opened. Delivery details 1.Standard shipping carrier is ePacket with tracking code for United States address,delivery within 7-14 busienss days. 2.For outside US address,standard shipping carrier is Hong Kong Post without tracking code,delivery within 25-30 business days.We provide a free tracking for order above 45USD.Please contact us if you want to add a tracking code for small orders. 3.Express shipping like DHL,Fedex,UPS,TNT is also avaiable if you are willing to pay extra.DHL is our standard shipping carrier for Expedited shipping,please contact us if you want a different carrier. Terms of sales 1.Customs duties or taxes are buyer's resposibility for all of the listings.Please check with your local customs office if you have any doubts. 2.Please confirm you are putting a correct and complete shipping address here.You are resposible for extra charge if your package been returned because of wrong address.If packages return because of wrong address,you will have to bear extra cost of shipping. About us 1.We are always here for you,offering friendly, comprehensive customer service every step of the way. Please follow the good eBay practice to contact us if any doubts and problems.We sincerely hope our item and customer service can give you the BEST BUYING EXPERIENCE on eBay. 2.We believe nothing can solve problems but communication.Please contact our team via ebay message first before leaving any non-positive feedbacks if you feel unhappy here. Contact us 1.We are always here for you,offering friendly, comprehensive customer service every step of the way. Please follow the good eBay practice to contact us if any doubts and problems.We sincerely hope our item and customer service can give you the BEST BUYING EXPERIENCE on eBay. 2.We believe nothing can solve problems but communication.Please contact our team via ebay message first before leaving any non-positive feedbacks if you feel unhappy here. Engineered for professional eBay sellers! On Dec-09-14 at 09:05:29 PST, seller added the following information:
By clicking "Accept All Cookies", you agree to the storing of cookies on your device to enhance site navigation, analyze site usage, and assist in our marketing efforts.