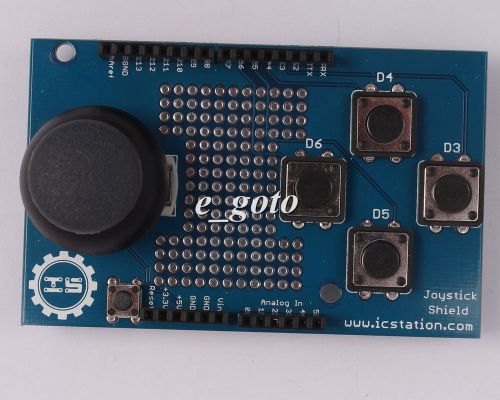
HOME New Arrivals Best sellers Daily Deals Help Desk Promotion News Store Categroy Store home Robots Raspberry Pi Wholesale Products Modules Development board Combination Items Breadboard DIY PCB Universal Board ICs & Processors Cables&Connectors Sensor Relay Crystal Oscillator Transistors Diodes Switch Battery & related Resistors&Potentiometers Tools Capacitor Inductor Digital tube Voltage regulator Fuse Buzzers&Speaker Helpful Links Store Newsletter Add my Store to your Favorites and receive my email newsletters about new items and special promotions! General Interest Hot Products title $16.90 title $1.96 title $1.59 title $1.75 title $3.20 title $5.35 title $7.90 ICSJ011A Gamepads Joystick Shield for Arduino Simulated Mouse And Keyboard The joystick shield provides simple analog inputs along with four separate buttons and one button under the joystick itself. The joystick can be used for controlling outputs such as a melody or pixels on a screen. The buttons can be used for navigation or game control How do I find the current position of the joystick? The position of the joystick is calculated from the two potentiometers in the joystick. The joystick can move in two dimensions which typically would represent X and Y coordinates but could represent any two dimensional quantity. To read the potentiometers we use the analogRead() function which returns a number from 0 to 1023. We need to supply an analog pin number to the function—for the joystick shield the X position is read from analog pin 0 and the Y position is read from analog pin 1: Serial.println(analogRead(0)); // Prints current X position Serial.println(analogRead(1)); // Prints current Y position It is a good technique—because it clarifies your intent—to use ''constants'' for values that will not change when your sketch runs. With this in mind, the following sketch snippet sets up constants for the analog pins used and prints the current X and Y positions to the serial console: const byte PIN_ANALOG_X = 0; const byte PIN_ANALOG_Y = 1; void setup() { Serial.begin(9600); } void loop() { Serial.print("x:"); Serial.print(analogRead(PIN_ANALOG_X)); Serial.print(" "); Serial.print("y:"); Serial.print(analogRead(PIN_ANALOG_Y)); Serial.print(" "); Serial.println(); } How do I find the current direction of the joystick? It can be useful to use the value of the X and Y position to determine if the joystick is centered or moved in one of 8 directions (i.e. up, right-up, right, right-down, down, left-down, left, left-up). Since we know the value in each dimension will be between 0 and 1023 you might expect the centre value to be around 511 or 512 but because the joysticks are physical devices the actual value is unlikely to be that exact. If we choose the wrong value we'll find thatour joystick will be detected as moving in a particular direction even though it is centered. To work around this issue we specify two "threshold" values and consider that any value within that range should be considered "centered": |----------|----|----------| 0 505 515 1023 The threshold values you choose may be different depending on your joystick. We specify the values as constants in the code: const int X_THRESHOLD_LOW = 505; const int X_THRESHOLD_HIGH = 515; const int Y_THRESHOLD_LOW = 500; const int Y_THRESHOLD_HIGH = 510; Next, we want to map our value in each dimension from a position range of 0 to 1023 to a direction value in the range -1 to 1. For the X dimension -1 means moved to the left, 0 means not moved in the X dimension and 1 means moved to the right. For the Y dimension -1 means moved down, 0 means not moved in the Y dimension and 1 means moved up. We start by setting the direction in each dimension to 0 ("centered") and then we use if/else statements to check if the position value in either dimension is above or below our threshold values: x_direction = 0; y_direction = 0; x_position = analogRead(PIN_ANALOG_X); y_position = analogRead(PIN_ANALOG_Y); if (x_position > X_THRESHOLD_HIGH) { x_direction = 1; } else if (x_position < X_THRESHOLD_LOW) { x_direction = -1; } if (y_position > Y_THRESHOLD_HIGH) { y_direction = 1; } else if (y_position < Y_THRESHOLD_LOW) { y_direction = -1; } The Arduino provides a map() function which in theory we could use instead of if/else but the method is complicated by the centering issues so we won't consider that approach here. As you can see in the next complete example we then use if/else statements to print the direction—you can modify this example to perform whatever action you need: const byte PIN_ANALOG_X = 0; const byte PIN_ANALOG_Y = 1; const int X_THRESHOLD_LOW = 505; const int X_THRESHOLD_HIGH = 515; const int Y_THRESHOLD_LOW = 500; const int Y_THRESHOLD_HIGH = 510; int x_position; int y_position; int x_direction; int y_direction; void setup() { Serial.begin(9600); } void loop () { x_direction = 0; y_direction = 0; x_position = analogRead(PIN_ANALOG_X); y_position = analogRead(PIN_ANALOG_Y); if (x_position > X_THRESHOLD_HIGH) { x_direction = 1; } else if (x_position < X_THRESHOLD_LOW) { x_direction = -1; } if (y_position > Y_THRESHOLD_HIGH) { y_direction = 1; } else if (y_position < Y_THRESHOLD_LOW) { y_direction = -1; } if (x_direction == -1) { if (y_direction == -1) { Serial.println("left-down"); } else if (y_direction == 0) { Serial.println("left"); } else { // y_direction == 1 Serial.println("left-up"); } } else if (x_direction == 0) { if (y_direction == -1) { Serial.println("down"); } else if (y_direction == 0) { Serial.println("centered"); } else { // y_direction == 1 Serial.println("up"); } } else { // x_direction == 1 if (y_direction == -1) { Serial.println("right-down"); } else if (y_direction == 0) { Serial.println("right"); } else { // y_direction == 1 Serial.println("right-up"); } } How do I set up the Arduino so I can know when a button has been pushed on the Joystick Shield? Before you can know if a button on the shield has been pushed you need to set up your Arduino to recognize the buttons. Unsurprisingly you will perform this setup in the... setup() function! First we define constants for the Arduino pin associated with each button: // Select button is triggered when joystick is pressed const byte PIN_BUTTON_SELECT = 2; const byte PIN_BUTTON_RIGHT = 3; const byte PIN_BUTTON_UP = 4; const byte PIN_BUTTON_DOWN = 5; const byte PIN_BUTTON_LEFT = 6; If you've used a pushbutton switch before you may have noticed a resistor is normally required in order to detect a known voltage when the button is not pressed. To reduce the number of parts required this shield has been designed not to require resistors on the shield itself. Are you thinking to yourself "if push buttons require resistors and the shield has no resistors how can we get the shield to work?"? If you're not thinking that then you can probably skip reading this bit. (And if you're thinking "I'm really hungry" it might be time to put down the electronics and get some food.) It turns out your Arduino actually has internal resistors connected to the pins inside the microcontroller. In order to use the internal resistors we need to "enable the internal pull-up resistors". If that sounds to you like "hoist the jib and unfurl the main stay" then I can explain some more: When a "pull-up" resistor is connected to a push button it means that the voltage level when the button is not pressed will be HIGH because the resistors "pulls the voltage level up" to HIGH when the button is not pressed. On a typical Arduino a pin that is HIGH will be at 5 volts. When the push button is pressed the pin will read as LOW because there is less resistance between the pin and ground than there is between the pin and 5 volts. To enable a pin's pull-up resistor you first set the pin as an input and then enable the pull-up: pinMode(PIN_BUTTON_RIGHT, INPUT); digitalWrite(PIN_BUTTON_RIGHT, HIGH); The actual code to enable the pull-up doesn't really make any sense if you read it literally but that's the way it works. Other than remembering that an unpressed button will read as HIGH with a pull-up resistor and a pressed button will read as LOW you don't need to remember or understand the other details. In order to configure each pin to be an input and enable the pull up resistors we use the following code: void setup() { pinMode(PIN_BUTTON_RIGHT, INPUT); digitalWrite(PIN_BUTTON_RIGHT, HIGH); pinMode(PIN_BUTTON_LEFT, INPUT); digitalWrite(PIN_BUTTON_LEFT, HIGH); pinMode(PIN_BUTTON_UP, INPUT); digitalWrite(PIN_BUTTON_UP, HIGH); pinMode(PIN_BUTTON_DOWN, INPUT); digitalWrite(PIN_BUTTON_DOWN, HIGH); pinMode(PIN_BUTTON_SELECT, INPUT); digitalWrite(PIN_BUTTON_SELECT, HIGH); } See the next section to learn how to read whether a button is pressed or not. How do I know when a button on the Joystick Shield has been pressed? Once you have set up your Arduino to recognize the buttons (see above) you can tell whether the button is pressed with the digitalRead() function. When the value read is LOW the button is pressed and when the value is HIGH the button is not pressed. if (digitalRead(PIN_BUTTON_LEFT) == LOW) { // Button is pressed } else { // Button is not pressed } The following complete example will print the state of each button and the value of the joystick to the Arduino serial console: // Store the Arduino pin associated with each input // Select button is triggered when joystick is pressed const byte PIN_BUTTON_SELECT = 2; const byte PIN_BUTTON_RIGHT = 3; const byte PIN_BUTTON_UP = 4; const byte PIN_BUTTON_DOWN = 5; const byte PIN_BUTTON_LEFT = 6; const byte PIN_ANALOG_X = 0; const byte PIN_ANALOG_Y = 1; void setup() { Serial.begin(9600); pinMode(PIN_BUTTON_RIGHT, INPUT); digitalWrite(PIN_BUTTON_RIGHT, HIGH); pinMode(PIN_BUTTON_LEFT, INPUT); digitalWrite(PIN_BUTTON_LEFT, HIGH); pinMode(PIN_BUTTON_UP, INPUT); digitalWrite(PIN_BUTTON_UP, HIGH); pinMode(PIN_BUTTON_DOWN, INPUT); digitalWrite(PIN_BUTTON_DOWN, HIGH); pinMode(PIN_BUTTON_SELECT, INPUT); digitalWrite(PIN_BUTTON_SELECT, HIGH); } void loop() { Serial.print("l:"); Serial.print(digitalRead(PIN_BUTTON_LEFT)); Serial.print(" "); Serial.print("r:"); Serial.print(digitalRead(PIN_BUTTON_RIGHT)); Serial.print(" "); Serial.print("u:"); Serial.print(digitalRead(PIN_BUTTON_UP)); Serial.print(" "); Serial.print("d:"); Serial.print(digitalRead(PIN_BUTTON_DOWN)); Serial.print(" "); Serial.print("x:"); Serial.print(analogRead(PIN_ANALOG_X)); Serial.print(" "); Serial.print("y:"); Serial.print(analogRead(PIN_ANALOG_Y)); Serial.print(" "); Serial.print("s:"); Serial.print(digitalRead(PIN_BUTTON_SELECT)); Serial.print(" "); Serial.println(); } SHIPPING PAYMENT RETURNS FEEDBACK ABOUT US 1)All items will be shipped to your paypal address .Please update your latest address when you check out,and please make sure to provide us with correct,precise and detailed shipping address. 2)Most of the items will be shipped via Hongkong Airmail/Singapore Airmail .To US customers,we will send the package via E-packet . 3)All items will be shipped in 1-2 business days (excluding Sat,Sun & Holiday) after payment received and cleared. For the long-time holiday, we'll post the info on our store and reply you automatically via emails. 4)Tax:We will do our best to help you to clear the goods,and the tax depends on each country custom. 5)If you don't receive items over 30 business days,please make sure to contact us before leaving any neutral or negative feedbacks.We'll try our best to help you solve the problem. 6)The product in our store is free shipping. But the shipping method is different based on your order.If your order is more than $50 ,we will send the items to you with tracking number for free.If your order is less than $50,the registered mail fee is on your side. We could also deliver your item via EMS,DHL or Fedex based on your requirement. We Only Accept Paypal on Ebay. For specific requirements, please feel free to contact us. 1)If for some reason you're not satisfied with our service or product quality, please contact us within 3 days after you get the package, you can return the products to us in original package and we will refund your money after we get the package!(Shipping cost is NOT refundable and you should responsible for the return shipping) 2)Although we test each item and they are packed professionally, few item(less than 0.1%) might be damaged during the shipping. You are welcome to contact us within 3 days after you receive your package about replacement. 3)Repair Some items might be broken caused by improper use, we are always happy to offer any helpful repair service. Of course, you can send the broken items back to us and we will help you resolve the situation and charge reasonable repair fees. Feedback is important to all of us participating on the eBay community. We are always working hard for maintain high standards of excellence and strive for 100% customer satisfaction. So yourPOSITIVE FEEDBACK is very important. Here is an illustration showing how to leave the positive feedback, please follow the following step. Thank you so much. And welcome back to our store again. ICs_Processors_Store is a leading company specializes in all kinds of IC products, such as electronic devices and components, development modules, development boards, consumptive materials and so on. ICs_Processors_Store has gained thousands upon thousands of registered customers from all over the world. We offer world wide free shipping and have already shipped to more than 150 countries including United Sates, United Kingdom, Canada, Australia, France, Germany, Russia, Italy, New Zealand, Spain, Brazil, Japan, Singapore, Korean, etc. Here is a list of reasons for trusting ICs_Processors_Store as your reliable source of IC products or business cooperator: 1.Competitive Price 2.High Quality Products 3.Excellent R & D team 4.Excellent shopping platform 5.Excellent Customer Experience 6.Excellent Team Work In ICs_Processors_Store, we provide variety of IC products, sell them at the best price, and offer the best service.You will never regret to have ICs_Processors_Store as your reliable IC item source, supplier, and business cooperators. Have fun! Robots Wholesale Products Sensor DIY Power Modules Development board Wireless Module LCD Modules i000000 inkfrog terapeak i000000 inkFrog Analytics On Nov-26-14 at 19:25:28 PST, seller added the following information:
By clicking "Accept All Cookies", you agree to the storing of cookies on your device to enhance site navigation, analyze site usage, and assist in our marketing efforts.