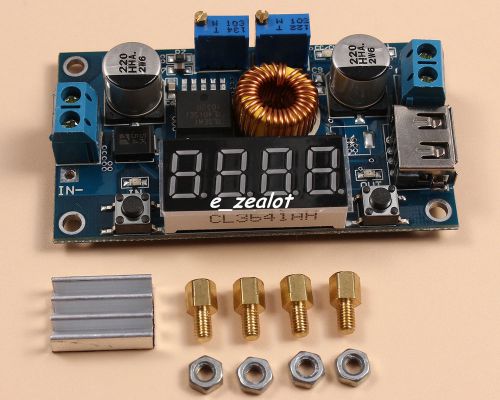
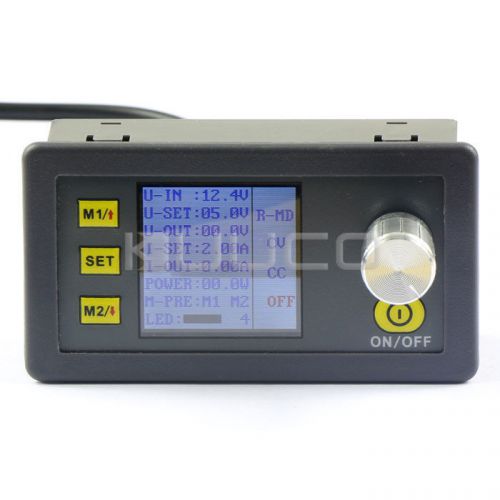
STORE HOME ABOUT US SHIPPING PAYMENT RETURNS FEEDBACK Store Categroy Holiday promotion Store home Robots Modules Development boards Breadboards DIY PCB Universal Boards Cables & Connectors Diodes ICs & Processors Controllable Color LEDs Capacitors Transistors Crystal Oscillators Resistors & Potentiometers Batteries & related items Buzzers & Loudspeakers Raspberry Pi Sensors Tools Relays Switches Inductors Voltage regulators Fuses Digital tubes Combination Items Electronic Component Industrial Automation Helpful Links Store Newsletter Add my Store to your Favorites and receive my email newsletters about new items and special promotions! General Interest Hot Products 1/8" Inch Plastic Electric Air Gas Water Solenoid Valve Normally Closed 12V DC $12.50 25W High Power LED Light Lamp SMD Chip 2300LM White 32-34V $3.15 Mega 2560 ATmega2560-16AU Board (Arduino-compatible) + Free USB Cable Funduino $16.92 4010S 40mm x40mm x10mm Brushless DC Cooling Fan $1.80 Prototype Board Electronic Deck 400 + 65pcs Breadboard Jumper Cable $4.35 20 sets NEW 3 pin connector kit Connector Lead Header 2.54mm XH-3P Kit $1.74 16mm Start Horn Button Momentary Stainless Steel Metal Push Button Switch?Blue? $4.10 5A LED Drive Lithium Battery Charger with Voltmeter Ammeter Perfect DCDC Module Similar Products for Recommendation ??? PL2303 USB To RS232 TTL Converter Adapter Module NEW NE555 Square Wave Duty Cycle and Frequency Adjustable Module LM317 Step Down DC 5V-35V to 1.25V-30V Kit DIY AC/DC Power Supply Module High Speed Digital MG995 Metal Gear 2BB Torque RC Servo for Savage XL FUTABA HPI DIY Kit Mobile Phone Signal Flash Light Radiation Power NEW NEW TDA7297 Version B 2*15W 2x15W Audio Amplifier Board Dual-Chann?el AC/DC 12V 1pcs NEW LM317 Adjustable Regulated Power Supply Suite DIY Kits 1 Set 3D LightSquar?ed DIY Kit 8x8x8 3mm LED Cube White LED Blue Ray Highlights : Contains the voltmeter, ammeter, power meter, USB interface for charging the digital products. Note: 1.When you use the product, the module inputs and outputs to be isolated from ground. 2.USB output voltage is consistent with the module, not a fixed 5V output. When charging for digital equipment, make sure USB output voltage is 5V. 3.Some customers report: ?The module can not adjust the output voltage is always equal to the input voltage.? When you encounter this problem, please counterclockwise rotation of the ?voltage potentiometer? 10 laps or more, then use the module you can adjust the output voltage. Because the factory default output voltage of about 20V. Specifications 1.Input voltage range:5-36VDC 2.Output voltage range:1.25-32VDC adjustable 3.Output current: 0-5A 4.Output power: 75W 5.High efficiency up to 96% 6.Built in thermal shutdown function 7.Built in current limit function 8.Built in output short protection function 9.Input reverse polarity protection: None (if required, high current diode in series with the input). 10.L x W x H =68.2×38.8×15mm 11.Weight: 39g Application 1.Use as a step-down modules with overcurrent protection Usage: (1) Adjust the right button so that ?OUT? LED lighted, Digital meter shows the value of output voltage ,adjust the ?voltage potentiometer? so that the output voltage reaches the value you want. (2) Adjust the right button so that Digital meter shows the value of output current;Wire shorted output terminal, then adjust the ?current potentiometer? so that the output current reaches a predetermined overcurrent protection value. (For example, the Digital meter displays the current value of 4A, then you can use the module to a maximum current of 4A) (3) Connected to the load. 2.Use as a battery charger Usage: (1) Make sure you need to charge the battery float voltage and charging current; (if lithium parameters 3.7V/2200mAh, then the float voltage is 4.2V, the maximum charging current 1C, ie 2200mA) (2)Under no-load conditions, adjust the ?Voltage potentiometer? so that the output voltage reaches the float voltage; (if to 3.7V rechargeable lithium battery, the output voltage can be adjusted to 4.2V) (3)Adjust the right button so that Digital meter shows the value of output current;Wire shorted output terminal, then adjust the ?current potentiometer? so that the output current reaches a predetermined Charging current value. (4)Charge turn lamp current factory default is 0.1 times the charging current; (Battery during charging current is gradually reduced, if the charge current setting is 1A, then when the charge current is less than 0.1A, blue lights turned off, the green light is on, which means that the battery is fully charged) (5)connected to the battery charge. (1,2,3,4 steps as: Output is unloaded, do not connect the battery) 3.Use as a LED constant current driver module Usage: (1)Adjust the ?voltage potentiometer? so that the output voltage reaches the value you want. (2)Adjust the right button so that Digital meter shows the value of output current;Wire shorted output terminal, then adjust the ?current potentiometer? so that the output current reaches a predetermined LED operating current. (3)Connect LED, work. (1,2 steps as: Output is unloaded, do not connect LED) Voltmeter and ammeter calibration method: Module with manual calibration function can correct display precision voltage and current, if you think the current voltage and current accuracy to meet the requirements, do not perform the following operations. (1) Output voltage calibration steps Step 1, adjust the right button so that ?OUT? LED lighted, Digital meter shows the value of output voltage; Press the right button for more than 2 seconds, release, Digital meter and ?OUT? LED flashes in synchronization so that you enter the output voltage calibration mode. Step 2, press the right button (normal speed), the voltage value is adding up a unit; Press the left button, minus a unit; Due to a unit is less than 0.1V, the minimum voltage display to 0.1V, so you need to continuously press 1-5 times to see the voltmeter change 0.1V, how many times voltmeter change 0.1V by pressing the key, depending on the current display voltage, the higher the voltage, the fewer the number of press. Step 3, press the right button for more than 2 seconds, release, to exit the output voltage calibration mode. All parameters set to automatically power down to save. (2) Input voltage calibration steps Step 1, adjust the right button so that ?IN? LED lighted, Digital meter shows the value of input voltage; press the right button for more than 2 seconds, release, Digital meter and ?IN? LED flashes in synchronization so that you enter the input voltage calibration mode. Steps 2 and 3, consistent with the output voltage calibration method. (3)Output current calibration steps Step 1, adjust the right button so that Digital meter shows the value of output Current. Press the right button for more than 2 seconds, release, Digital meter flashes in synchronization so that you enter the output current calibration mode. Step 2,Connected to the load, ammeter in series, adjust the right and left button to change the display of digital meter, so that is consistent with the ammeter display . More details 1. wiring diagram 2.Package 3.Charging 4.Five Disply Mode inkfrog terapeak i000000 inkFrog Analytics On Dec-22-14 at 08:44:04 PST, seller added the following information:
By clicking "Accept All Cookies", you agree to the storing of cookies on your device to enhance site navigation, analyze site usage, and assist in our marketing efforts.